Passing Files to DCP#
Distributed-CellProfiler can be told what files to use through LoadData.csv, Batch Files, or file lists.
Metadata use in DCP#
Distributed-CellProfiler requires metadata and grouping in order to split jobs. This means that, unlikely a generic CellProfiler workflow, the inclusion of metadata and grouping are NOT optional for pipelines you wish to use in Distributed-CellProfiler.
If using LoadData, this means ensuring that your input CSV has some metadata to use for grouping and “Group images by metdata?” is set to “Yes”.
If using batch files or file lists, this means ensuring that the Metadata and Groups modules are enabled, and that you are extracting metadata from file and folder names that will also be present in your remote system in the Metadata module in your CellProfiler pipeline. You can pass additional metadata to CellProfiler by
Add another extraction method, setting the method toImport from fileand setting Metadata file location toDefault Input Folder. Metadata of either type can be used for grouping.
Load Data#
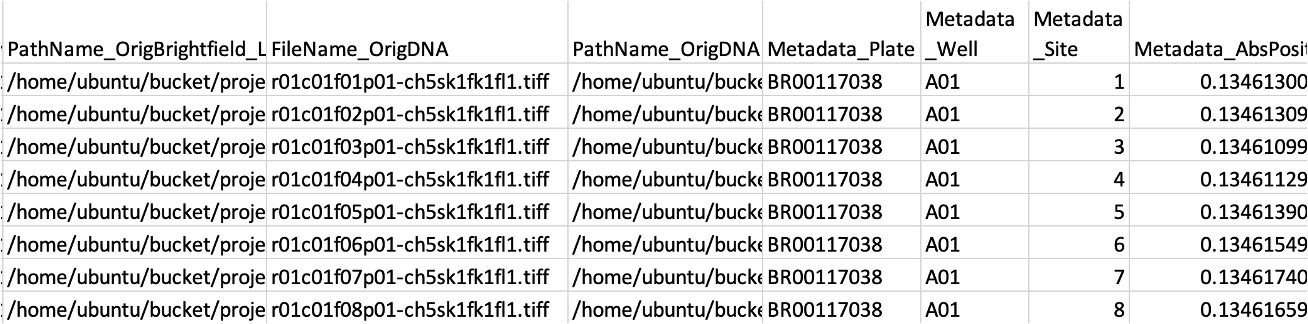
LoadData.csv are CSVs that tell CellProfiler how the images should be parsed.
At a minimum, this CSV should contain PathName_{NameOfChannel} and FileName_{NameOfChannel} columns for each of your channels, as well as Metadata_{PieceOfMetadata} for each kind of metadata being used to group your image sets.
It can contain any other metadata you would like to track.
Some users have reported issues with using relative paths in the PathName columns; using absolute paths beginning with /home/ubuntu/bucket/{relativepath} may increase your odds of success.
Creating LoadData.csv#
You can create this CSV yourself via your favorite scripting language. We maintain a script for creating LoadData.csv from Phenix metadata XML files called pe2loaddata.
You can also create the LoadData.csv in a local copy of CellProfiler using the standard input modules of Images, Metadata, NamesAndTypes and Groups.
More written and video information about using the input modules can be found here.
After loading in your images, use the Export->Image Set Listing command.
You will then need to replace the local paths with the paths where the files can be found in S3 which is hardcoded to /home/ubuntu/bucket.
If your files are nested in the same structure, this can be done with a simple find and replace in any text editing software.
(e.g. Find ‘/Users/eweisbar/Desktop’ and replace with ‘/home/ubuntu/bucket’)
More detail: The Dockerfile is the first script to execute in the Docker.
It creates the /home/ubuntu/ folder and then executes run_worker.sh from that point.
run_worker.sh makes /home/ubuntu/bucket/ and uses S3FS to mount your S3 bucket at that location. (If you set DOWNLOAD_FILES='True' in your config, then the S3FS mount is bypassed but files are downloaded locally to the /home/ubuntu/bucket path so that the paths are the same as if it was S3FS mounted.)
Using LoadData.csv#
To use a LoadData.csv with submitJobs, put the path to the LoadData.csv in data_file:.
To use a LoadData.csv with run_batch_general.py, enter the name of the LoadData.csv under #project specific stuff in {STEP}name.
At the bottom of the file, make sure there are no arguments or batch=False in the command for the step you are running.
(e.g. MakeAnalysisJobs() or MakeAnalysisJobs(batch=False))
Note that if you do not follow our standard file organization, under #not project specific, unless you deviate from the structure you will also need to edit datafilepath.
Batch Files#
Batch files are an easy way to transition from running locally to distributed.
A batch file is an .h5 file created by CellProfiler which captures all the data needed to run your workflow - pipeline and file information are packaged together.
To use a batch file, your data needs to have the same structure in the cloud as on your local machine.
Creating batch files#
To create a batch file, load all your images into a local copy of CellProfiler using the standard input modules of Images, Metadata, NamesAndTypes and Groups.
More written and video information about using the input modules can be found here.
Put the CreateBatchFiles module at the end of your pipeline and ensure that it is selected.
Add a path mapping and edit the Local root path and Cluster root path.
Run the CellProfiler pipeline by pressing the Analyze Images button; note that it won’t actually run your pipeline but will instead create a batch file.
More information on the CreateBatchFiles module can be found here.
Using batch files#
To use a batch file with submitJobs, put the path to the .h5 file in data_file: and pipeline:.
To use a batch file with run_batch_general.py, enter the name of the batch file under #project specific stuff in batchpipename{STEP}.
At the bottom of the file, set batch=True in the command for the step you are running.
(e.g. MakeAnalysisJobs(batch=True))
Note that if you do not follow our standard file organization, under #not project specific, unless you deviate from the structure you will also need to edit batchpath.
Note that batch files are NOT currently compatible with DOWNLOAD_FILES being set to True, since the file downloading code cannot at this time parse the batch file to figure out the necessary files needed for the run.
File lists#
You can also simply pass a list of absolute file paths (not relative paths) with one file per row in .txt format.
These must be the absolute paths that Distributed-CellProfiler will see, aka relative to the root of your bucket (which will be mounted as /bucket.
Creating File Lists#
Use any text editing software to create a .txt file where each line of the file is a path to a single image that you want to process.
Using File Lists#
To use a file list with submitJobs, put the path to the .txt file in data_file:.